使用示例
Callable & FutureTask
Callable<String> callableTask = () -> {
    TimeUnit.SECONDS.sleep(2);
    return "Callable Task Result";
};

FutureTask<String> futureTask = new FutureTask<>(callableTask);
Thread thread = new Thread(futureTask);
thread.start();
CompletableFuture
CompletableFuture<String> completableFuture = CompletableFuture.supplyAsync(() -> {
    try {
        TimeUnit.SECONDS.sleep(1);
    } catch (InterruptedException e) {
        throw new IllegalStateException(e);
    }
    return "CompletableFuture Result";
});
深入使用
以下示例来自:CompletableFuture原理与实践-外卖商家端API的异步化 - 美团技术团队 (meituan.com)
CF的使用是基于构造依赖树的,一个CompletableFuture的使用会触发另外一系列依赖它的CF执行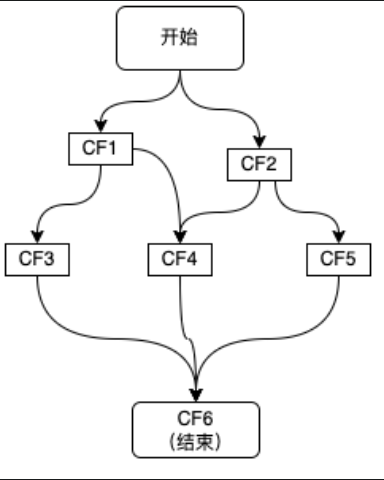
服务依赖
// 无依赖
ExecutorService executor = Executors.newFixedThreadPool(5);
// 直接发起异步调用
CompletableFuture<String> cf1 = CompletableFuture.supplyAsync(() -> "result1",executor);
// 直接返回一个已经完成的CompletableFuture
CompletableFuture<String> cf2 = CompletableFuture.completedFuture("result2");

// 单个依赖
CompletableFuture<String> cf3 = cf1.thenApply(result -> {
    System.out.println("result1: " + result);
    return "result3";
});
CompletableFuture<String> cf4 = cf1.thenCombine(cf2, (result1, result2) -> {
    //result1和result2分别为cf1和cf2的结果
    return "result4";
});
// 多依赖
CompletableFuture<Void> cf6 = CompletableFuture.allOf(cf3, cf4, cf5);
CompletableFuture<String> result = cf6.thenApply(v -> {
    //这里的join并不会阻塞,因为传给thenApply的函数是在CF3、CF4、CF5全部完成时,才会执行 。
    result3 = cf3.join();
    result4 = cf4.join();
    result5 = cf5.join();
    //根据result3、result4、result5组装最终result;
    return "result";
});
// 或者使用anyOf,只要有一个依赖完成即可完成
源码解读(基于JDK1.8)
Callable
Callable是用于定义和返回结果,并且可能抛出异常的任务,类似于Runnable
@FunctionalInterface
public interface Callable<V> {
    /**
     * call 方法是 Callable 接口中的唯一方法,用于执行任务并返回结果。它与 Runnable 接口的 run 方法类似,但 call 方法可以返回一个结果并且可以抛出受检异常
     */
     V call() throws Exception;
}
FutureTask
先梳理一下继承关系,Future是一个接口,定义了一些属性,然后
public interface RunnableFuture<V> extends Runnable, Future<V> {
    /**
     * Sets this Future to the result of its computation
     * unless it has been cancelled.
     */
    void run();
}
所以FutureTask就是一个Future的实际实现,是基于Runnable实现的
public class FutureTask<V> implements RunnableFuture<V> {
	// 任务的运行状态,初始为 NEW。状态只在 set、setException 和 cancel 方法中转换为终止状态。
	private volatile int state;
    private static final int NEW          = 0;
    private static final int COMPLETING   = 1;
    private static final int NORMAL       = 2;
    private static final int EXCEPTIONAL  = 3;
    private static final int CANCELLED    = 4;
    private static final int INTERRUPTING = 5;
    private static final int INTERRUPTED  = 6;

	// 重要的属性
	// 底层的callable,运行后置为null
	private Callable<V> callable;
	// get()方法返回的结果或者抛出的异常
    private Object outcome; // non-volatile, protected by state reads/writes
	// 运行callable的线程,在run()期间CAS设置
    private volatile Thread runner;
	// 等待线程的Triber栈
    private volatile WaitNode waiters;
	// 返回结果或者返回异常
	private V report(int s) throws ExecutionException {
        Object x = outcome;
        if (s == NORMAL)
            return (V)x;
        if (s >= CANCELLED)
            throw new CancellationException();
        throw new ExecutionException((Throwable)x);
    }
    // 构造函数,接收callable作为参数来执行任务
    public FutureTask(Callable<V> callable) {
        if (callable == null)
            throw new NullPointerException();
        this.callable = callable;
        this.state = NEW;       // ensure visibility of callable
    }
    // 获取执行结果
    public V get() throws InterruptedException, ExecutionException {
        int s = state;
		// 如果还处于未完成的状态则调用awaitDone
        if (s <= COMPLETING)
            s = awaitDone(false, 0L);
		// 返回执行结果或者异常
        return report(s);
    }
    // 核心执行
    // 因为封装了Runnable接口,所以可以直接执行使用主线程
    public void run() {
	    // 如果任务状态不是NEW或者使用CAS无法将runner设置为当前线程,直接返回
        if (state != NEW ||
            !UNSAFE.compareAndSwapObject(this, runnerOffset,
                                         null, Thread.currentThread()))
            return;
        try {
            Callable<V> c = callable;
            if (c != null && state == NEW) {
                V result;
                boolean ran;
                try {
					// 调用callable的call方法去执行callable封装的任务
                    result = c.call();
                    ran = true;
                } catch (Throwable ex) {
                    result = null;
                    ran = false;
                    setException(ex);
                }
                if (ran)
					// 设置返回结果
                    set(result);
            }
        } finally {
            // runner must be non-null until state is settled to
            // prevent concurrent calls to run()
			// 线程置为null,防止并发调用线程
            runner = null;
            // state must be re-read after nulling runner to prevent
            // leaked interrupts
            int s = state;
            if (s >= INTERRUPTING)
                handlePossibleCancellationInterrupt(s);
        }
    }
    // 停止执行任务实际上就是将执行任务的写线程从runner属性中取出然后调用interupt信号,这里省略
    ...
    //

}
通过分析源码,我们发现Future获取结果的方式是通过阻塞实现的,会阻塞当前线程,如何避免阻塞呢?
CompletableFuture(以下简称CF)
为何会选择CF呢?
- 可组合:可以将多个依赖操作通过不同的方式进行编排
- 操作融合:将数据流中使用的多个操作符以某中方式组合起来从而降低开销
- 延迟执行
- 学习成本低
- 相比于只能通过阻塞或者轮询获得结果而且不支持回调方法的Future,CF支持回调的方式进行处理结果,同时支持组合操作支持进一步的编排
定义
让我们首先关注它的定义
public class CompletableFuture<T> implements Future<T>, CompletionStage<T> {
	...
}可以发现奥秘就在CompletionStage这个接口中,CompletionStage用于标识执行过程中的一个步骤(Stage),从而实现了服务编排
CompletionStage
定义了一系列任务的步骤,具体实现看CompletableFuture是如何实现的
基本属性
public class CompletableFuture<T> implements Future<T>, CompletionStage<T> {
	// 用于存储当前CF的结果
	volatile Object result;
	// stack用于表示当前CF完成后需要触发的依赖动作
    volatile Completion stack;
}
从这里我们看出,使用了类似于”观察者”模式设计思想,被观察者是CompletableFuture,而观察者是这些需要回调的依赖动作
Completion的定义
Completion是定义在CompletableFuture里的
abstract static class Completion extends ForkJoinTask<Void>
       implements Runnable, AsynchronousCompletionTask {
       volatile Completion next;      // Treiber stack link

       /**
        * Performs completion action if triggered, returning a
        * dependent that may need propagation, if one exists.
        *
        * @param mode SYNC, ASYNC, or NESTED
        */
       abstract CompletableFuture<?> tryFire(int mode);

       /** Returns true if possibly still triggerable. Used by cleanStack. */
       abstract boolean isLive();

       public final void run()                { tryFire(ASYNC); }
       public final boolean exec()            { tryFire(ASYNC); return false; }
       public final Void getRawResult()       { return null; }
       public final void setRawResult(Void v) {}
   }
依赖的流程
public <U> CompletableFuture<U> thenApply(
    Function<? super T,? extends U> fn) {
    return uniApplyStage(null, fn);
}
private <V> CompletableFuture<V> uniApplyStage(
    Executor e, Function<? super T,? extends V> f) {
    if (f == null) throw new NullPointerException();
    Object r;
    // 如果已经任务已经完成了,直接调用uniApplyNow
    if ((r = result) != null)
        return uniApplyNow(r, e, f);
    // 创建一个新的未完成CompletableFuture
    CompletableFuture<V> d = newIncompleteFuture();
	// 将这个新的UniApply压栈
    unipush(new UniApply<T,V>(e, d, this, f));
    return d;
}

private <V> CompletableFuture<V> uniApplyNow(
    Object r, Executor e, Function<? super T,? extends V> f) {
    Throwable x;
	// 创建一个新的CompletableFuture
    CompletableFuture<V> d = newIncompleteFuture();
    if (r instanceof AltResult) {
        if ((x = ((AltResult)r).ex) != null) {
            d.result = encodeThrowable(x, r);
            return d;
        }        r = null;
    }    try {
        if (e != null) {
			// 不是异常就执行新的UniApply任务
            e.execute(new UniApply<T,V>(null, d, this, f));
        } else {
            @SuppressWarnings("unchecked") T t = (T) r;
            d.result = d.encodeValue(f.apply(t));
        }    } catch (Throwable ex) {
        d.result = encodeThrowable(ex);
    }    return d;
}

 final void unipush(Completion c) {
        if (c != null) {
			// 尝试将c压栈,知道成功或者任务完成为止
            while (!tryPushStack(c)) {
                if (result != null) {
                    NEXT.set(c, null);
                    break;
                }
            }
            if (result != null)
                c.tryFire(SYNC);
        }
}- 简单理解一下就是,在CF完成任务时,会去观察者链中出栈一个,然后执行,并且返回一个新的CompletableFuture,然后后续继续去完成后续依赖任务
- 如果原始任务还没完成,那么就会将新的任务推入栈中,等待原始任务完成
执行过程
以 supplyAsync为例
// 有自定义线程池的调用函数
public static <U> CompletableFuture<U> supplyAsync(Supplier<U> supplier,
                                                   Executor executor) {
    return asyncSupplyStage(screenExecutor(executor), supplier);
}

// 没有自定义线程池会使用自带的线程池
private static final Executor ASYNC_POOL = USE_COMMON_POOL ?
    ForkJoinPool.commonPool() : new ThreadPerTaskExecutor();

public static <U> CompletableFuture<U> supplyAsync(Supplier<U> supplier) {
    return asyncSupplyStage(ASYNC_POOL, supplier);
}
// 实际执行者
static <U> CompletableFuture<U> asyncSupplyStage(Executor e,
                                                 Supplier<U> f) {
    if (f == null) throw new NullPointerException();
    CompletableFuture<U> d = new CompletableFuture<U>();
    // 调用线程池去执行
    e.execute(new AsyncSupply<U>(d, f));
    return d;
}
通过阅读源码,我们可以发现,原来CompletableFuture执行任务是会使用我们提交给它的线程池或者它自己默认去生成一个线程池去执行的,相比FutureTask通过阻塞去等待结果,确实是提升了性能。
关于线程池的源码和原理解析,以及一些八股知识,欢迎翻看鄙人的另一篇《深入浅出线程池》博客观看